2023WMCTF

MISC

find me

img

提示在Reddit发了动态

通过相关搜索发现帖子 https://www.reddit.com/user/WearyMeadow/

img

base64解码得到 https://ufile.io/670unszp ,下载了一个流量包,里面有几个验证过程,找到密钥:mysecretkey,但不知道加解密实现方法

在刚刚的图片发现头像是github风格的头像,在github找到几个仓库

其中有一个是博客 https://wearymeadow.icu/,里面有一篇加密的文章,里面是流量包的加解密方法

img

不知道密码,在仓库中注意到了autoAuth,看到有个密码,密码复用

img

打开博客发现加解密方法

server.py

1
2
3
4
5
6
7
8
9
10
11
12
13
14
15
16
17
18
19
20
21
22
import socket
import random
from Crypto.Cipher import AES
from sys import argv

def pad(s):
return s + b"\0" * (AES.block_size - len(s) % AES.block_size)

def encrypt(message, key):
seed = random.randint(0, 11451)
random.seed(seed)
encrypted = b''
for i in range(len(message)):
encrypted += bytes([message[i] ^ random.randint(0, 255)])
cipher = AES.new(key, AES.MODE_ECB)
encrypted = cipher.encrypt(pad(encrypted))
return encrypted

def decrypt(ciphertext, key):
# Still working on this...
pass
...

爆破seed

1
2
3
4
5
6
7
8
9
10
11
12
13
14
15
16
17
18
19
20
21
22
23
import random
from Crypto.Cipher import AES

def pad(s):
return s + b"\0" * (AES.block_size - len(s) % AES.block_size)

def decrypt(ciphertext, key):
# AES解密
cipher = AES.new(key, AES.MODE_ECB)
decrypted = cipher.decrypt(ciphertext)
# 爆破seed生成相同随机数
for seed in range(11451):
random.seed(seed)
res = b''
for i in range(len(decrypted)):
res += bytes([decrypted[i]^random.randint(0, 255)])
if b'WMCTF' in res:
print(res)

ciphertext = bytes.fromhex('778f6cc13090c6a4f0b51939d784a6b38512f80a92b82bf8225fb8bfed713b2f8eee53dfbe228c7296449d904467a1677c83b9534e2dfcfcbc6f7b08f77f96f2')
key = pad(b'mysecretkey')
decrypt(ciphertext, key)
#b'well, here you are: WMCTF{OH_Y0u_f1nd_Me__(@_@)}\xb0.T\x80&\xb5\xb1\x1epGZ)\xbe6\xc8\xcc'

Fantastic terminal

起一个docker ,docker-compose up -d

1
2
root@localhost:/# ls
root@localhost:/# cat challenge
img

Oversharing

题目容器是ssh,给了流量包里有smb协议,导出smb可以发现有lsass.dmp

img

mimikatz提出密码

img

拿到ssh密码,ssh登录cat flag即可

Steg

EZ_v1deo

题目:视频好像被L1near弄坏掉了♂

当时一直以为是视频缺少了一段或者损坏了,在这个方向上浪费好多时间

最后用ffmpeg将每一帧提取出来,试了一下lsb,结果发现有隐写

ffmpeg -i flag.avi ./%4d.png

这样提取出210帧,每隔4、5帧有是相同的帧,stegsolve逐个看

还可以写脚本生成

1
2
3
4
5
6
7
8
9
10
11
12
13
14
15
16
17
18
19
20
21
22
23
24
25
26
27
28
29
30
31
32
33
import cv2
import numpy as np
#提取最低有效位
def extract_lsb(frame):
return frame & 1

def main(input_video, output_video):
#打开视频
cap = cv2.VideoCapture(input_video)
#获取宽、高、帧率
width = int(cap.get(cv2.CAP_PROP_FRAME_WIDTH))
height = int(cap.get(cv2.CAP_PROP_FRAME_HEIGHT))
fps = int(cap.get(cv2.CAP_PROP_FPS))
# 设置输出视频的编码器和参数
fourcc = cv2.VideoWriter_fourcc(*'XVID')
out = cv2.VideoWriter(output_video, fourcc, fps, (width, height), isColor=True)
#循环读帧
while cap.isOpened():
ret, frame = cap.read()
if not ret:
break
#提取最低每一帧最低有效位到新帧,写入
lsb_frame = extract_lsb(frame) * (255, 255, 255)
out.write(lsb_frame.astype(np.uint8))

cap.release()
out.release()
cv2.destroyAllWindows()

if __name__ == '__main__':
input_video = 'flag.avi'
output_video = 'new.avi'
main(input_video, output_video)

Mondy left me Broken

看着wp做的

首先,猫脸变换

img

对于广义的猫脸变换

img

得到其逆变换公式,通过以下脚本爆破出a,b

得到a=5,b=5,还原视频

1
2
3
4
5
6
7
8
9
10
11
12
13
14
15
16
17
18
19
20
21
22
23
24
25
26
27
28
29
30
31
32
33
34
35
36
37
38
39
40
41
42
43
44
45
46
47
48
49
50
51
52
53
54
55
56
57
58
59
60
import numpy as np
from PIL import Image
import cv2

# #爆破a,b
# im = Image.open('final.jpg')
# im = np.array(im)

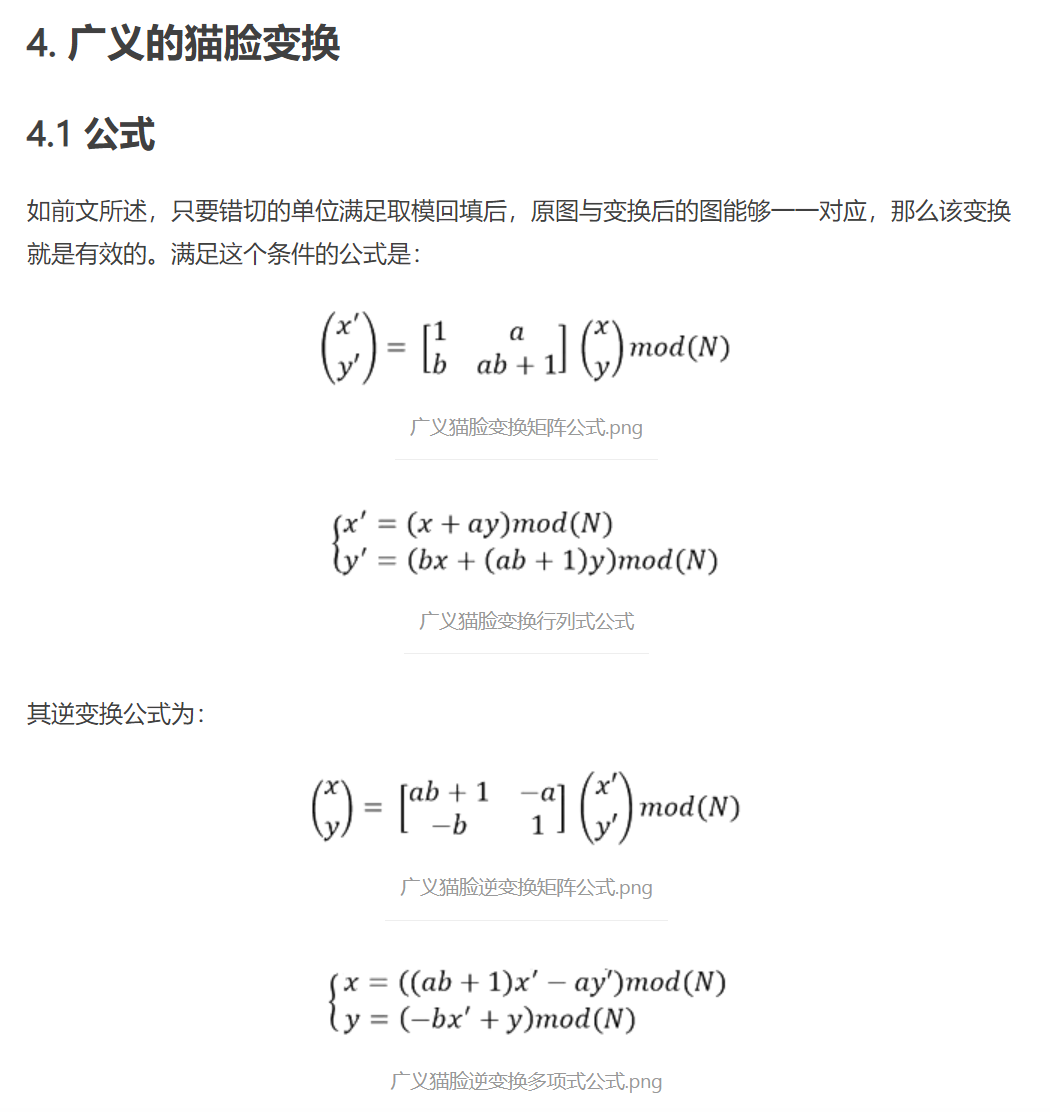
# def dearnold(img):
# r,c,t = img.shape
# p = np.zeros((r,c,t),dtype=np.uint8)
# for a in range(1, 11):
# for b in range(1, 11):
# for i in range(r):
# for j in range(c):
# for k in range(t):
# x = ((a*b+1)*i - b*j)%r
# y = (-a*i + j)%r
# p[x,y,k] = img[i,j,k]
# filename = f'./dearnold{a}_{b}.jpg'
# cv2.imwrite(filename, p)
# print('dearnold{}_{}'.format(a, b))
# return p
# #dearnold(im)
# ##直接看图片dearnold5_5为正常图片=>得到a=5, b=5

def video_dearnold(img):
r,c,t = img.shape
p = np.zeros((r,c,t),dtype=np.uint8)
a = 5
b = 5
for i in range(r):
for j in range(c):
for k in range(t):
x = ((a*b+1)*i - b*j)%r
y = (-a*i + j)%r
p[x,y,k] = img[i,j,k]
return p
def video(input_video,output_video):
#打开视频
cap = cv2.VideoCapture(input_video)
#获取宽、高、帧率
width = int(cap.get(cv2.CAP_PROP_FRAME_WIDTH))
height = int(cap.get(cv2.CAP_PROP_FRAME_HEIGHT))
fps = int(cap.get(cv2.CAP_PROP_FPS))
# 设置输出视频的编码器和参数
fourcc = cv2.VideoWriter_fourcc(*'mp4v')
out = cv2.VideoWriter(output_video, fourcc, fps, (width, height), isColor=True)

while cap.isOpened():
ret, frame = cap.read()
if ret:
frame = video_dearnold(frame)``
out.write(frame)
else:
break
cap.release()
out.release()

video('final.mkv','new.mp4')

wp说后半段flag在视频中,但是确实看不清

imgimg

hint直接放出_I_CAN_GOT_both}

img
img

dct水印

原理可以参考 https://weipp7.gitee.io/posts/e1e00902.html

我这里找了很久找不到原音频(不知道怎么从bilibili弄原音频 https://www.bilibili.com/video/BV1Fh4y1M79t/?spm_id_from=333.337.search-card.all.click),贴个输出频谱图的脚本吧

1
2
3
4
5
6
7
8
9
10
11
12
from scipy.io import wavfile
from scipy.fftpack import dct, idct, fft, fftfreq, ifft
import matplotlib.pyplot as plt
from matplotlib.mlab import window_none
rate, data = wavfile.read('origin.wav')
rate2, data2 = wavfile.read('final.wav')
data3 = data2 - data
#输出data3的频谱图
n_samples = data3.shape[0]
fft_size = 4096
plt.specgram(data3 , fft_size, rate, window=window_none,noverlap=10, scale='dB')
plt.show()

WEB

AnyFileRead

参考:https://zhuanlan.zhihu.com/p/640655127

img

SpringSecurityConfig:

img

payload:/admin/../flag

借用别人的图:

img

ez_java_agagin

环境关了没下附件,绕过java和flag字符串,用file/netdoc + url二次编码绕过

payload:/Imagefile?url1=netdoc://java/..//%25%36%36%25%36%63%25%36%31%25%36%37


2023WMCTF
http://example.com/2023/08/27/2023WMCTF/
作者
dddkia
发布于
2023年8月27日
许可协议